ContainerLab Extended Configurations
This tutorial covers advanced ContainerLab configurations and features for experienced users who want to explore traffic generation, automation integration, and complex lab setups.
Table of Contents
- Detailed Installation Guide
- Traffic Generation with Ostinato
- Advanced Lab Examples
- Ansible Integration
- Working with Different Vendor Images
- Lab Management Commands
- Integration with Automation Tools
- Troubleshooting
Detailed Installation Guide
Step 1: Install Docker
For the most up-to-date Docker installation instructions, visit the official Docker documentation:
- Docker Installation Guide - Official installation instructions for all platforms
- Docker Desktop - For Windows and macOS users
Quick verification after installation:
Step 2: Install ContainerLab
Method 1: Using the Official Install Script (Recommended)
# Download and run the installation script
bash -c "$(curl -sL https://get.containerlab.dev)"

# Verify installation
containerlab version
Method 2: Manual Installation
# Download the latest release
VERSION=$(curl -s https://api.github.com/repos/srl-labs/containerlab/releases/latest | grep 'tag_name' | cut -d\" -f4)
wget https://github.com/srl-labs/containerlab/releases/download/${VERSION}/containerlab_${VERSION}_Linux_amd64.tar.gz

# Extract and install
sudo tar -xzf containerlab_${VERSION}_Linux_amd64.tar.gz -C /usr/local/bin containerlab
sudo chmod +x /usr/local/bin/containerlab

# Verify installation
containerlab version
Step 3: Install Additional Tools (Optional)
Install Docker Compose
# Download Docker Compose
sudo curl -L "https://github.com/docker/compose/releases/latest/download/docker-compose-$(uname -s)-$(uname -m)" -o /usr/local/bin/docker-compose

# Make it executable
sudo chmod +x /usr/local/bin/docker-compose

# Verify installation
docker-compose --version
Install Network Tools
# Install additional networking tools
sudo apt install -y bridge-utils iproute2 net-tools tcpdump

# Or for CentOS/RHEL
sudo yum install -y bridge-utils iproute net-tools tcpdump
Step 4: Docker Compose Installation (Alternative Method)
For those who prefer using Docker Compose for ContainerLab deployment, here's a complete setup:
Docker Compose Setup
Create a docker-compose.yml file:
version: '3.8'

services:
  containerlab:
    image: ghcr.io/srl-labs/containerlab:latest
    container_name: containerlab
    privileged: true
    network_mode: host
    volumes:
      - /var/run/docker.sock:/var/run/docker.sock
      - ./labs:/labs
      - ./configs:/configs
      - ./images:/images
    environment:
      - CLAB_HOST=0.0.0.0
      - CLAB_PORT=8080
    restart: unless-stopped
    command: ["sleep", "infinity"]

  # Optional: Web UI for ContainerLab
  containerlab-ui:
    image: ghcr.io/srl-labs/containerlab-ui:latest
    container_name: containerlab-ui
    ports:
      - "3000:3000"
    environment:
      - CLAB_API_URL=http://localhost:8080
    depends_on:
      - containerlab
    restart: unless-stopped

  # Optional: Grafana for lab monitoring
  grafana:
    image: grafana/grafana:latest
    container_name: containerlab-grafana
    ports:
      - "3001:3000"
    environment:
      - GF_SECURITY_ADMIN_PASSWORD=admin
    volumes:
      - grafana_data:/var/lib/grafana
    restart: unless-stopped

  # Optional: Prometheus for metrics collection
  prometheus:
    image: prom/prometheus:latest
    container_name: containerlab-prometheus
    ports:
      - "9090:9090"
    volumes:
      - ./prometheus.yml:/etc/prometheus/prometheus.yml
      - prometheus_data:/prometheus
    command:
      - '--config.file=/etc/prometheus/prometheus.yml'
      - '--storage.tsdb.path=/prometheus'
      - '--web.console.libraries=/etc/prometheus/console_libraries'
      - '--web.console.templates=/etc/prometheus/consoles'
      - '--storage.tsdb.retention.time=200h'
      - '--web.enable-lifecycle'
    restart: unless-stopped

volumes:
  grafana_data:
  prometheus_data:
Prometheus Configuration
Create prometheus.yml:
global:
  scrape_interval: 15s
  evaluation_interval: 15s

scrape_configs:
  - job_name: 'containerlab'
    static_configs:
      - targets: ['localhost:8080']
    metrics_path: /metrics

  - job_name: 'network-devices'
    static_configs:
      - targets: ['192.168.1.10:9100', '192.168.1.11:9100']
    scrape_interval: 30s
Directory Structure
# Create the directory structure
mkdir -p containerlab-setup/{labs,configs,images}
cd containerlab-setup

# Copy the docker-compose.yml and prometheus.yml files
# Then start the services
docker-compose up -d

# Access ContainerLab
docker exec -it containerlab containerlab version

# Deploy a lab
docker exec -it containerlab containerlab deploy -t /labs/lab.yml
Using ContainerLab with Docker Compose
# Deploy a lab
docker exec -it containerlab containerlab deploy -t /labs/my-lab.yml

# List running labs
docker exec -it containerlab containerlab list

# Access a device
docker exec -it containerlab containerlab exec -t /labs/my-lab.yml --label clab-node-name=ceos1

# Destroy a lab
docker exec -it containerlab containerlab destroy -t /labs/my-lab.yml
Traffic Generation with Ostinato
For comprehensive network testing and validation, you can use Ostinato - a powerful traffic generator that integrates seamlessly with ContainerLab.
What is Ostinato?
 Ostinato is a commercial network packet generator and analyzer that supports:
- Multiple protocols: TCP, UDP, ICMP, ARP, BGP, OSPF, and more
- Custom packet crafting: Full control over packet headers and payloads
- Traffic patterns: Burst, continuous, and custom traffic patterns
- Statistics: Real-time packet statistics and analysis
- Container support: Runs natively in Docker containers
- Multiple platforms: Windows, macOS, Linux, Raspberry Pi, Docker containers
Ostinato is a commercial network packet generator and analyzer that supports:
- Multiple protocols: TCP, UDP, ICMP, ARP, BGP, OSPF, and more
- Custom packet crafting: Full control over packet headers and payloads
- Traffic patterns: Burst, continuous, and custom traffic patterns
- Statistics: Real-time packet statistics and analysis
- Container support: Runs natively in Docker containers
- Multiple platforms: Windows, macOS, Linux, Raspberry Pi, Docker containers
Pricing Tiers: - ContainerLab Edition: $49/user (special ContainerLab license) - Starter: $49+/user (single platform) - Pro Bundle: $169+/user/yr (multiple platforms, email support) - Business Bundle: $289+/user/yr (all platforms, priority support)
Note: Ostinato offers a special ContainerLab Edition specifically designed for ContainerLab integration, priced at $49/user. This edition includes containerized GUI traffic generator with VNC access and is optimized for use within ContainerLab topologies.
Installing Ostinato in ContainerLab
Method 1: Using Official Ostinato Docker Image for ContainerLab
# Load the ContainerLab-specific Ostinato image (requires ContainerLab license)
docker load -i docker-ostinato-{tag}.tgz

# Verify the image is loaded
docker images | grep ostinato
ContainerLab Edition Features: - Containerized GUI traffic generator - VNC access to GUI (port 5900) - REST API access (port 7878) - Optimized for ContainerLab integration - Version 1.3 (latest)
Note: The ContainerLab Edition requires a valid license. Visit https://ostinato.org/pricing/clab for the special ContainerLab licensing options.
Method 2: Alternative Open-Source Traffic Generators
Since Ostinato is now commercial, consider these open-source alternatives:
Scapy (Python-based):
# Install Scapy
pip install scapy

# Use in ContainerLab with Python container
docker run -it python:3.9-alpine sh
pip install scapy
Iperf3 (Bandwidth testing):
# Pull iperf3 image
docker pull networkstatic/iperf3:latest

# Use in ContainerLab topology
nodes:
  iperf_server:
    kind: linux
    image: networkstatic/iperf3:latest
    exec:
      - cmd: "iperf3 -s"
Pktgen (High-performance):
Integrating Ostinato with ContainerLab
Basic Traffic Generation Topology
Add traffic generator nodes to your ContainerLab topology:
name: traffic-test-lab
topology:
  nodes:
    # Network devices
    switch1:
      kind: arista_ceos
      image: ceos:4.34.2F

    switch2:
      kind: arista_ceos
      image: ceos:4.34.2F

    # Traffic generators (choose one based on your needs)
    # Option 1: Ostinato ContainerLab Edition (commercial, requires license)
    ostinato1:
      kind: linux
      image: ostinato/ostinato:{tag}
      mgmt_ipv4: 192.168.1.100
      ports:
        - 5900:5900/tcp  # VNC access to GUI
        - 7878:7878/tcp  # REST API access

    # Option 2: Scapy (open-source)
    scapy1:
      kind: linux
      image: python:3.9-alpine
      mgmt_ipv4: 192.168.1.101
      exec:
        - cmd: "pip install scapy"
        - cmd: "python -c 'from scapy.all import *; send(IP(dst=\"192.168.1.1\")/ICMP())'"

    # Option 3: Iperf3 (bandwidth testing)
    iperf_server:
      kind: linux
      image: networkstatic/iperf3:latest
      mgmt_ipv4: 192.168.1.102
      exec:
        - cmd: "iperf3 -s -D"

    iperf_client:
      kind: linux
      image: networkstatic/iperf3:latest
      mgmt_ipv4: 192.168.1.103
      exec:
        - cmd: "iperf3 -c 192.168.1.102 -t 30"

  links:
    - endpoints: ["switch1:eth1", "switch2:eth1"]
    - endpoints: ["ostinato1:eth1", "switch1:eth2"]
    - endpoints: ["scapy1:eth1", "switch1:eth3"]
    - endpoints: ["iperf_server:eth1", "switch2:eth2"]
    - endpoints: ["iperf_client:eth1", "switch2:eth3"]

mgmt:
  network: mgmt-net
  ipv4-subnet: 192.168.1.0/24
Advanced Traffic Generation Configuration
For more complex traffic generation scenarios:
name: advanced-traffic-lab
topology:
  nodes:
    # Core network
    core1:
      kind: nokia_srlinux
      image: ghcr.io/nokia/srlinux

    core2:
      kind: nokia_srlinux
      image: ghcr.io/nokia/srlinux

    # Multiple traffic generators for different traffic types
    # Option 1: Ostinato (commercial)
    bgp_traffic:
      kind: linux
      image: ostinato/ostinato:latest
      mgmt_ipv4: 192.168.1.110
      exec:
        - cmd: "ostinato -p 7878 -d"
        - cmd: "sleep 10 && ostinato-drone -p 7878 -i eth1 -c /configs/bgp_traffic.pcap"

    # Option 2: Scapy for custom protocols
    custom_traffic:
      kind: linux
      image: python:3.9-alpine
      mgmt_ipv4: 192.168.1.111
      exec:
        - cmd: "pip install scapy"
        - cmd: "python /configs/custom_traffic.py"

    # Option 3: Iperf3 for bandwidth testing
    bandwidth_test:
      kind: linux
      image: networkstatic/iperf3:latest
      mgmt_ipv4: 192.168.1.112
      exec:
        - cmd: "iperf3 -s -D"
        - cmd: "sleep 5 && iperf3 -c 192.168.1.113 -t 60 -i 1"

  links:
    - endpoints: ["core1:ethernet-1/1", "core2:ethernet-1/1"]
    - endpoints: ["bgp_traffic:eth1", "core1:ethernet-1/2"]
    - endpoints: ["custom_traffic:eth1", "core1:ethernet-1/3"]
    - endpoints: ["bandwidth_test:eth1", "core2:ethernet-1/2"]

mgmt:
  network: mgmt-net
  ipv4-subnet: 192.168.1.0/24
Creating Traffic Profiles
BGP Traffic Profile (Ostinato)
Create configs/bgp_traffic.pcap:
# Generate BGP traffic profile for Ostinato
cat > configs/bgp_traffic.pcap << 'EOF'
# BGP Open message
frame 1 {
    eth {
        dst: 00:11:22:33:44:55
        src: aa:bb:cc:dd:ee:ff
        type: 0x0800
    }
    ip {
        dst: 10.1.1.1
        src: 10.1.1.2
        ttl: 255
    }
    tcp {
        dst: 179
        src: 12345
        flags: 0x02  # SYN
    }
    bgp {
        type: 1  # OPEN
        version: 4
        as: 65001
        holdtime: 180
        identifier: 10.1.1.2
    }
}
EOF
Custom Traffic Script (Scapy)
Create configs/custom_traffic.py:
#!/usr/bin/env python3
from scapy.all import *
import time

def send_bgp_traffic():
    """Send BGP-like traffic using Scapy"""
    # Create BGP-like packets
    for i in range(100):
        # Create IP packet with custom payload
        pkt = IP(dst="10.1.1.1", src="10.1.1.2") / \
              TCP(dport=179, sport=12345+i) / \
              Raw(load=f"BGP_UPDATE_{i}")

        send(pkt, verbose=False)
        time.sleep(0.1)

def send_http_traffic():
    """Send HTTP-like traffic using Scapy"""
    # Create HTTP-like packets
    for i in range(50):
        # HTTP GET request
        pkt = IP(dst="192.168.1.100", src="192.168.1.101") / \
              TCP(dport=80, sport=12345+i) / \
              Raw(load="GET / HTTP/1.1\r\nHost: example.com\r\n\r\n")

        send(pkt, verbose=False)
        time.sleep(0.2)

if __name__ == "__main__":
    print("Starting custom traffic generation...")
    send_bgp_traffic()
    send_http_traffic()
    print("Traffic generation completed")
Iperf3 Configuration
Create configs/iperf_config.txt:
# Iperf3 configuration for bandwidth testing
cat > configs/iperf_config.txt << 'EOF'
# Server configuration
-s          # Run as server
-D          # Run as daemon
-p 5201     # Port 5201
-i 1        # Interval 1 second
-t 300      # Test duration 300 seconds

# Client configuration
-c 192.168.1.102  # Client mode, target server
-p 5201           # Port 5201
-t 60             # Test duration 60 seconds
-i 1              # Interval 1 second
-w 65536          # Window size
EOF
Using Traffic Generator Interfaces
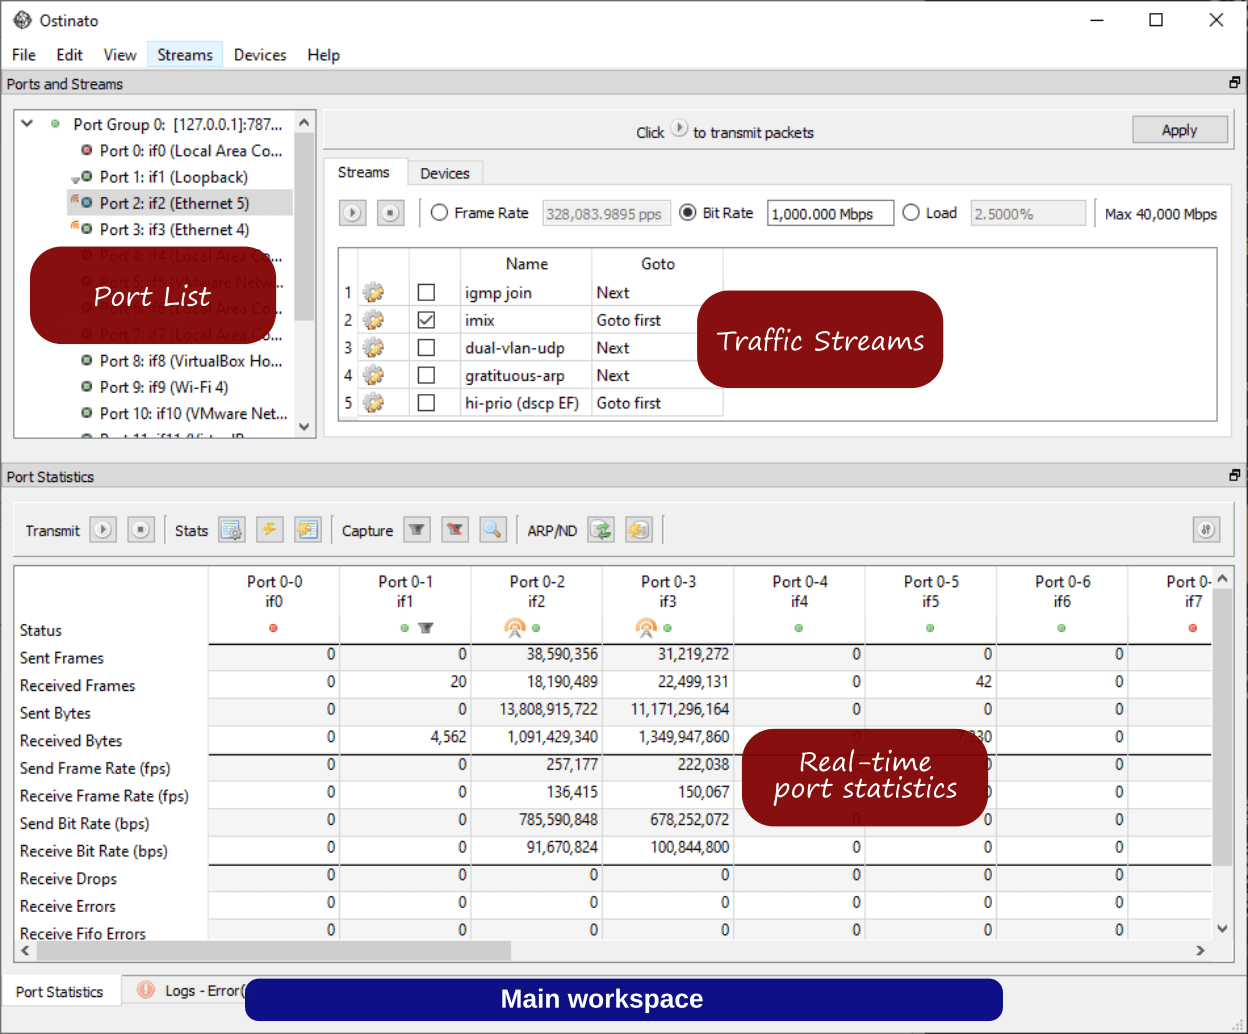
Accessing Ostinato GUI (Commercial)
# Deploy the lab
containerlab deploy -t traffic-lab.yml

# Access Ostinato GUI via VNC (ContainerLab Edition)
# Connect VNC client to <host-ip>:5900
# This will bring up the Ostinato GUI interface

# For multiple Ostinato nodes, use different VNC ports:
# ostinato1: <host-ip>:5900
# ostinato2: <host-ip>:5901
# ostinato3: <host-ip>:5902

# Alternative: Use native Ostinato GUI
# In the native GUI, use File | New PortGroup and enter host IP
# Note: Native GUI controller is NOT included with ContainerLab Edition
Ostinato GUI Features (Commercial)
- Stream Editor: Create and modify traffic streams
- Port Statistics: Real-time traffic statistics
- Packet Capture: Capture and analyze packets
- Traffic Control: Start/stop traffic generation
- Configuration: Save and load traffic profiles
Using Scapy Interactive Mode
# Access Scapy container
containerlab exec -t traffic-lab.yml --label clab-node-name=scapy1

# Start interactive Scapy session
python -c "from scapy.all import *; ls()"

# Send custom packets
send(IP(dst="192.168.1.1")/ICMP())
Iperf3 Web Interface
# Access Iperf3 statistics
docker exec -it iperf_server iperf3 -s -p 5201

# Run bandwidth test
docker exec -it iperf_client iperf3 -c 192.168.1.102 -t 30 -i 1
Command-Line Traffic Generation
Using ostinato-drone (Commercial)
# Generate traffic from command line (requires license)
docker exec -it ostinato1 ostinato-drone \
    -p 7878 \
    -i eth1 \
    -c /configs/bgp_traffic.pcap \
    --rate 1000 \
    --duration 60

# Generate continuous traffic
docker exec -it ostinato1 ostinato-drone \
    -p 7878 \
    -i eth1 \
    -c /configs/bgp_traffic.pcap \
    --rate 100 \
    --continuous
Using Scapy (Open-source)
# Generate custom traffic with Scapy
docker exec -it scapy1 python /configs/custom_traffic.py

# Send specific packet types
docker exec -it scapy1 python -c "
from scapy.all import *
send(IP(dst='192.168.1.1')/ICMP())
send(IP(dst='192.168.1.1')/TCP(dport=80)/Raw(load='GET / HTTP/1.1'))
"
Using Iperf3 (Open-source)
# Start bandwidth test
docker exec -it iperf_client iperf3 -c 192.168.1.102 -t 60 -i 1

# Test different protocols
docker exec -it iperf_client iperf3 -c 192.168.1.102 -u -b 100M  # UDP
docker exec -it iperf_client iperf3 -c 192.168.1.102 -t 30 -R    # Reverse test
Traffic Generation Scripts
Create automation scripts for traffic testing:
#!/bin/bash
# traffic_test.sh

# Option 1: Ostinato (commercial)
echo "Starting BGP traffic with Ostinato..."
docker exec -it ostinato1 ostinato-drone \
    -p 7878 \
    -i eth1 \
    -c /configs/bgp_traffic.pcap \
    --rate 1000 \
    --duration 30 &

# Option 2: Scapy (open-source)
echo "Starting custom traffic with Scapy..."
docker exec -it scapy1 python /configs/custom_traffic.py &

# Option 3: Iperf3 (open-source)
echo "Starting bandwidth test with Iperf3..."
docker exec -it iperf_client iperf3 -c 192.168.1.102 -t 30 -i 1 &

# Wait for completion
wait
echo "Traffic generation completed"
Monitoring and Analysis
Real-time Statistics
# Get port statistics
docker exec -it ostinato1 ostinato-drone \
    -p 7878 \
    --stats

# Monitor specific streams
docker exec -it ostinato1 ostinato-drone \
    -p 7878 \
    --stats \
    --stream 1
Packet Capture and Analysis
# Capture packets on network interface
docker exec -it ostinato1 tcpdump -i eth1 -w /tmp/capture.pcap

# Analyze captured packets
docker exec -it ostinato1 tcpdump -r /tmp/capture.pcap -A
Integration with Network Automation
Ansible Playbook for Traffic Testing
---
- name: Traffic Generation Test
  hosts: ostinato_hosts
  tasks:
    - name: Start BGP traffic
      command: >
        ostinato-drone -p 7878 -i eth1
        -c /configs/bgp_traffic.pcap
        --rate 1000 --duration 60

    - name: Wait for traffic completion
      wait_for:
        timeout: 70

    - name: Collect statistics
      command: >
        ostinato-drone -p 7878 --stats
      register: traffic_stats

    - name: Display results
      debug:
        var: traffic_stats.stdout_lines
Python Script for Automated Testing
#!/usr/bin/env python3
# traffic_automation.py

import subprocess
import time
import json

def start_traffic(ostinato_host, port, config, rate, duration):
    """Start traffic generation on Ostinato host"""
    cmd = [
        'docker', 'exec', '-it', ostinato_host,
        'ostinato-drone',
        '-p', str(port),
        '-i', 'eth1',
        '-c', config,
        '--rate', str(rate),
        '--duration', str(duration)
    ]

    return subprocess.Popen(cmd)

def get_statistics(ostinato_host, port):
    """Get traffic statistics"""
    cmd = [
        'docker', 'exec', '-it', ostinato_host,
        'ostinato-drone',
        '-p', str(port),
        '--stats'
    ]

    result = subprocess.run(cmd, capture_output=True, text=True)
    return result.stdout

def main():
    # Start multiple traffic streams
    processes = []

    # BGP traffic
    p1 = start_traffic('ostinato1', 7878, '/configs/bgp_traffic.pcap', 1000, 60)
    processes.append(p1)

    # HTTP traffic
    p2 = start_traffic('ostinato2', 7879, '/configs/http_traffic.pcap', 500, 60)
    processes.append(p2)

    # Wait for completion
    for p in processes:
        p.wait()

    # Collect statistics
    print("BGP Traffic Statistics:")
    print(get_statistics('ostinato1', 7878))

    print("HTTP Traffic Statistics:")
    print(get_statistics('ostinato2', 7879))

if __name__ == "__main__":
    main()
Best Practices
1. Traffic Planning
- Define clear test objectives
- Use realistic traffic patterns
- Consider network capacity limits
- Plan for different traffic types
2. Resource Management
- Monitor system resources during traffic generation
- Use appropriate packet rates
- Clean up completed test sessions
- Limit concurrent traffic streams
3. Configuration Management
- Store traffic profiles in version control
- Document traffic patterns and purposes
- Use consistent naming conventions
- Create reusable traffic templates
4. Monitoring and Validation
- Monitor network device statistics
- Validate QoS policies
- Check for packet loss and latency
- Analyze traffic patterns
Troubleshooting
Common Issues
# Check Ostinato service status
docker exec -it ostinato1 ps aux | grep ostinato

# Verify network connectivity
docker exec -it ostinato1 ping -c 3 192.168.1.1

# Check port availability
docker exec -it ostinato1 netstat -tlnp | grep 7878

# View Ostinato logs
docker logs ostinato1
Performance Optimization
# Increase system limits for high-rate traffic
echo 1000000 > /proc/sys/net/core/netdev_max_backlog

# Optimize Docker network performance
docker network create --driver bridge --opt com.docker.network.bridge.name=ostinato-br ostinato-net
For more information about Ostinato, visit https://ostinato.org/.
Advanced Lab Examples
Multi-Vendor Lab with Automation
Complex Topology
name: automation-lab
topology:
  nodes:
    # Core switches
    core1:
      kind: ceos
      image: ceos:4.28.0F
      mgmt_ipv4: 192.168.1.10
      startup-config: configs/core1.cfg

    core2:
      kind: ceos
      image: ceos:4.28.0F
      mgmt_ipv4: 192.168.1.11
      startup-config: configs/core2.cfg

    # Distribution switches
    dist1:
      kind: ceos
      image: ceos:4.28.0F
      mgmt_ipv4: 192.168.1.20
      startup-config: configs/dist1.cfg

    dist2:
      kind: ceos
      image: ceos:4.28.0F
      mgmt_ipv4: 192.168.1.21
      startup-config: configs/dist2.cfg

    # Edge router
    edge1:
      kind: srl
      image: srlinux:22.11.1
      mgmt_ipv4: 192.168.1.30
      startup-config: configs/edge1.cfg

    # Management server
    mgmt:
      kind: linux
      image: ubuntu:20.04
      mgmt_ipv4: 192.168.1.100
      exec:
        - cmd: "apt update && apt install -y ansible python3-pip"
        - cmd: "pip3 install napalm netmiko"

    # Test hosts
    host1:
      kind: linux
      image: alpine:latest
      mgmt_ipv4: 192.168.1.101

    host2:
      kind: linux
      image: alpine:latest
      mgmt_ipv4: 192.168.1.102

  links:
    # Core to distribution
    - endpoints: ["core1:eth1", "dist1:eth1"]
    - endpoints: ["core1:eth2", "dist2:eth1"]
    - endpoints: ["core2:eth1", "dist1:eth2"]
    - endpoints: ["core2:eth2", "dist2:eth2"]

    # Distribution to edge
    - endpoints: ["dist1:eth3", "edge1:eth1"]
    - endpoints: ["dist2:eth3", "edge1:eth2"]

    # Hosts to distribution
    - endpoints: ["host1:eth1", "dist1:eth4"]
    - endpoints: ["host2:eth1", "dist2:eth4"]

    # Management to core
    - endpoints: ["mgmt:eth1", "core1:eth3"]
Configuration Files
Create configuration files in a configs/ directory:
# Create configs directory
mkdir -p configs

# Core1 configuration
cat > configs/core1.cfg << 'EOF'
!
hostname core1
!
interface Ethernet1
   description Link to dist1
   no switchport
   ip address 10.1.1.1/30
!
interface Ethernet2
   description Link to dist2
   no switchport
   ip address 10.1.2.1/30
!
interface Ethernet3
   description Management
   no switchport
   ip address 192.168.1.10/24
!
router ospf 1
   network 10.1.1.0/30 area 0
   network 10.1.2.0/30 area 0
!
EOF

# Dist1 configuration
cat > configs/dist1.cfg << 'EOF'
!
hostname dist1
!
interface Ethernet1
   description Link to core1
   no switchport
   ip address 10.1.1.2/30
!
interface Ethernet2
   description Link to core2
   no switchport
   ip address 10.1.3.1/30
!
interface Ethernet3
   description Link to edge1
   no switchport
   ip address 10.2.1.1/30
!
interface Ethernet4
   description Link to host1
   switchport mode access
   switchport access vlan 10
!
vlan 10
   name DATA
!
router ospf 1
   network 10.1.1.0/30 area 0
   network 10.1.3.0/30 area 0
   network 10.2.1.0/30 area 0
!
EOF
Ansible Integration
Inventory File
Create inventory.yml:
all:
  children:
    network_devices:
      children:
        arista:
          hosts:
            core1:
              ansible_host: 192.168.1.10
              ansible_network_os: eos
              ansible_connection: network_cli
              ansible_user: admin
              ansible_password: admin
            core2:
              ansible_host: 192.168.1.11
              ansible_network_os: eos
              ansible_connection: network_cli
              ansible_user: admin
              ansible_password: admin
            dist1:
              ansible_host: 192.168.1.20
              ansible_network_os: eos
              ansible_connection: network_cli
              ansible_user: admin
              ansible_password: admin
            dist2:
              ansible_host: 192.168.1.21
              ansible_network_os: eos
              ansible_connection: network_cli
              ansible_user: admin
              ansible_password: admin
        nokia:
          hosts:
            edge1:
              ansible_host: 192.168.1.30
              ansible_network_os: srl
              ansible_connection: network_cli
              ansible_user: admin
              ansible_password: admin
    linux_hosts:
      hosts:
        mgmt:
          ansible_host: 192.168.1.100
          ansible_user: root
        host1:
          ansible_host: 192.168.1.101
          ansible_user: root
        host2:
          ansible_host: 192.168.1.102
          ansible_user: root
Ansible Playbook
Create playbook.yml:
---
- name: Configure Network Devices
  hosts: network_devices
  gather_facts: no

  tasks:
    - name: Gather device facts
      network_facts:

    - name: Display device facts
      debug:
        var: ansible_net_version

    - name: Configure hostname
      network_config:
        lines:
          - hostname "{{ inventory_hostname }}"

    - name: Configure interfaces
      network_config:
        lines:
          - description "Configured by Ansible"
        parents: "{{ item }}"
      loop:
        - "interface Ethernet1"
        - "interface Ethernet2"
        - "interface Ethernet3"

    - name: Save running config
      network_config:
        save_when: modified
Working with Different Vendor Images
Cisco Images (Subscription Required)
Cisco XE
# Download Cisco XE (requires Cisco DevNet account)
# Visit: https://developer.cisco.com/site/ios-xe/
# Download: ios-xe-17.03.01a.tar.xz

# Extract and import
tar -xJf ios-xe-17.03.01a.tar.xz
docker import ios-xe-17.03.01a.tar.xz cisco_xe:17.03.01a
Cisco Topology Example
name: cisco-lab
topology:
  nodes:
    cisco1:
      kind: cisco_xe
      image: cisco_xe:17.03.01a
      mgmt_ipv4: 192.168.1.10
      startup-config: configs/cisco1.cfg

    cisco2:
      kind: cisco_xe
      image: cisco_xe:17.03.01a
      mgmt_ipv4: 192.168.1.11
      startup-config: configs/cisco2.cfg

  links:
    - endpoints: ["cisco1:eth1", "cisco2:eth1"]
Juniper Images (Subscription Required)
Juniper vMX
# Download Juniper vMX (requires Juniper account)
# Visit: https://www.juniper.net/us/en/dm/downloads/
# Download: vmx-20.4R1.12.tgz

# Extract and import
tar -xzf vmx-20.4R1.12.tgz
docker import vmx-20.4R1.12.tar.xz juniper_vmx:20.4R1.12
Lab Management Commands
Basic Commands
# Deploy a lab
containerlab deploy -t lab.yml

# Destroy a lab
containerlab destroy -t lab.yml

# List running labs
containerlab list

# Inspect lab topology
containerlab inspect -t lab.yml

# Execute commands on nodes
containerlab exec -t lab.yml --label clab-node-name=node1 -- cmd

# Get lab topology graph
containerlab graph -t lab.yml

# Save lab state
containerlab save -t lab.yml

# Load lab state
containerlab load -t lab.yml
Advanced Commands
# Deploy with specific nodes
containerlab deploy -t lab.yml --nodes node1,node2

# Deploy with custom topology
containerlab deploy --topo custom-topo.yml

# Get detailed node information
containerlab inspect -t lab.yml --all

# Execute interactive shell
containerlab exec -t lab.yml --label clab-node-name=node1

# Get lab logs
containerlab logs -t lab.yml

# Export lab configuration
containerlab export -t lab.yml --format yaml
Integration with Automation Tools
Nornir Integration
# nornir_inventory.py
from nornir import InitNornir
from nornir.plugins.tasks.networking import napalm_get

# Initialize Nornir
nr = InitNornir(
    inventory={
        "plugin": "SimpleInventory",
        "options": {
            "host_file": "inventory/hosts.yml",
            "group_file": "inventory/groups.yml",
            "defaults_file": "inventory/defaults.yml",
        }
    }
)

# Get facts from all devices
result = nr.run(task=napalm_get, getters=["facts", "interfaces"])

# Print results
for host, task_result in result.items():
    print(f"{host}: {task_result[0].result}")
Terraform Integration
# main.tf
terraform {
  required_providers {
    docker = {
      source  = "kreuzwerker/docker"
      version = "~> 3.0"
    }
  }
}

# Deploy ContainerLab using external data source
data "external" "containerlab" {
  program = ["containerlab", "deploy", "-t", "lab.yml", "--format", "json"]
}

# Use lab information in Terraform
resource "null_resource" "configure_network" {
  depends_on = [data.external.containerlab]

  provisioner "local-exec" {
    command = "ansible-playbook -i inventory.yml playbook.yml"
  }
}
Troubleshooting
Common Issues
Docker Permission Issues
Image Import Issues
# Check available images
docker images

# Remove corrupted images
docker rmi image_name:tag

# Re-import images
docker import image.tar.xz image_name:tag
Network Connectivity Issues
# Check Docker networks
docker network ls

# Inspect network
docker network inspect containerlab

# Check container connectivity
containerlab exec -t lab.yml --label clab-node-name=node1 -- ping 8.8.8.8
Performance Issues
# Check system resources
docker stats

# Limit container resources
# Add to topology file:
nodes:
  node1:
    kind: ceos
    image: ceos:4.28.0F
    mgmt_ipv4: 192.168.1.10
    cpu_limit: 1
    memory_limit: 1G
Next Steps
For more advanced topics and examples, check out: - ContainerLab Overview and Installation - Comprehensive guide - Building a Reusable Network Automation Lab - Complete lab example - Containerlab Documentation - Multi-vendor Network Testing
Happy labbing! 🚀