Getting started with containerlab
Containerlab is a powerful tool for creating and managing container-based network labs. This tutorial will guide you through the basic setup process to get your first network topology running quickly.
Table of Contents
- Prerequisites
- Quick Installation
- Downloading Network Images
- Creating Your First Topology
- Basic Commands
- VS Code/Cursor IDE Integration
- Troubleshooting
- Next Steps
Prerequisites
Before starting with containerlab, ensure you have the following installed:
- Docker: Containerlab relies on Docker to run network device containers
- Linux/macOS: Containerlab works best on Linux and macOS systems
- Git: For cloning repositories and managing configurations
- Network tools: Basic networking knowledge and tools like
ping,ssh,telnet
Quick Installation
Step 1: Install Docker
For the most up-to-date Docker installation instructions, visit the official Docker documentation:
- Docker Installation Guide - Official installation instructions for all platforms
- Docker Desktop - For Windows and macOS users
Quick verification after installation:
Step 2: Install ContainerLab
# Download and run the installation script
bash -c "$(curl -sL https://get.containerlab.dev)"

# Verify installation
containerlab version
Add useraccount to groups
Add your user account to the following groups:
When is each group needed?
docker— Required for Containerlab to talk to the Docker daemon (pull images, create and run lab containers). Without it, you cannot run labs.clab_admins— Only needed when the Containerlab binary is installed with the SUID bit and restricted to this group. Then only root or users inclab_adminsare allowed to runcontainerlab.
After adding yourself to a group, log out and back in (or reboot) so the new group membership takes effect.
Root-level privileges
Much like the docker group, any users part of the clab_admins group are effectively given root-level privileges to the system running Containerlab.
If this group does not exist and the binary still has the SUID bit set, any user who can run Containerlab should be treated as having root privileges.
Downloading Network Images
Containerlab supports various network vendor images. Here's how to download and import the most popular ones:
Downloading Arista cEOS Image
- Create an Arista account:
- Go to https://www.arista.com
-
Create an account or login to your existing account
-
Navigate to software downloads:
-
Go to Support → Software Download
-
Select cEOS version:
- Choose your desired cEOS version
-
Download the
cEOS64-<version>.tar.xzfile -
Import the image:
Downloading Nokia SR Linux Image
Nokia SR Linux is available as a public container image and can be pulled directly:
# Pull Nokia SR Linux image from GitHub Container Registry
docker pull ghcr.io/nokia/srlinux

# Verify the image is downloaded
docker images | grep srlinux
Downloading Alpine Linux Image
Alpine Linux is a lightweight Linux distribution perfect for testing and automation:
# Pull Alpine Linux image
docker pull alpine:latest

# Verify the image is downloaded
docker images | grep alpine
Creating Your First Topology
Basic Topology File
Create a simple topology file named lab.yml:
name: my-first-lab
topology:
  nodes:
    # Arista cEOS switch
    switch1:
      kind: ceos
      image: ceos:4.34.2F

    # Nokia SR Linux router
    router1:
      kind: srl
      image: ghcr.io/nokia/srlinux

    # Linux host for testing
    host1:
      kind: linux
      image: alpine:latest

  links:
    - endpoints: ["switch1:eth1", "router1:eth1"]
    - endpoints: ["host1:eth1", "switch1:eth2"]

mgmt:
  network: mgmt-net
  ipv4-subnet: 172.20.20.0/24
Deploy Your First Lab
# Deploy the lab
containerlab deploy -t lab.yml

# Check lab status
containerlab list

# Show lab topology
containerlab inspect --name my-first-lab
Basic Commands
Lab Management
# Deploy a lab
containerlab deploy -t lab.yml

# List running labs
containerlab list

# Show lab topology
containerlab inspect --name my-first-lab

# Connect to a device
containerlab connect --name switch1

# Destroy a lab
containerlab destroy --name my-first-lab

# Destroy all labs
containerlab destroy --all
Device Access
# SSH to a device (if configured)
ssh admin@172.20.20.10

# Execute commands on device
containerlab exec --name switch1 --cmd "show version"

# Access device shell
containerlab exec --name switch1
VS Code/Cursor IDE Integration
ContainerLab provides excellent integration with VS Code and Cursor IDE through the official ContainerLab extension, making it easy to manage labs, edit topologies visually, and view network diagrams.
Installing the ContainerLab Extension
- Open VS Code or Cursor IDE
- Go to Extensions (Ctrl+Shift+X)
- Search for "ContainerLab"
- Install the official ContainerLab extension
Extension Features
Lab Management
- Deploy/Destroy labs directly from the IDE
- List running labs with status information
- Connect to devices with one click
- Execute commands on network devices
Visual Topology Editor (TopoEditor)
- Drag-and-drop interface for creating topologies
- Visual node placement and connection management
- Real-time topology validation
- Export to YAML format
Topology Visualization
- Web-based viewer for topology diagrams
- Draw.io integration for custom diagrams
- TopoViewer for interactive topology exploration
- Export to various formats (PNG, SVG, PDF)
Using the Extension
1. Open a ContainerLab Project
# Create a new lab directory
mkdir my-containerlab-project
cd my-containerlab-project

# Open in VS Code/Cursor
code .  # or cursor .
2. Create a Topology File
Create a lab.yml file in your project:
name: simple-lab
topology:
  nodes:
    switch1:
      kind: ceos
      image: ceos:4.34.2F
    router1:
      kind: srl
      image: ghcr.io/nokia/srlinux
    host1:
      kind: linux
      image: alpine:latest
  links:
    - endpoints: ["switch1:eth1", "router1:eth1"]
    - endpoints: ["host1:eth1", "switch1:eth2"]
mgmt:
  network: mgmt-net
  ipv4-subnet: 172.20.20.0/24
3. Use the Extension Commands
- Ctrl+Shift+P to open command palette
- Type "ContainerLab" to see available commands:
ContainerLab: Deploy LabContainerLab: Destroy LabContainerLab: List LabsContainerLab: Open Topology ViewContainerLab: Connect to Device
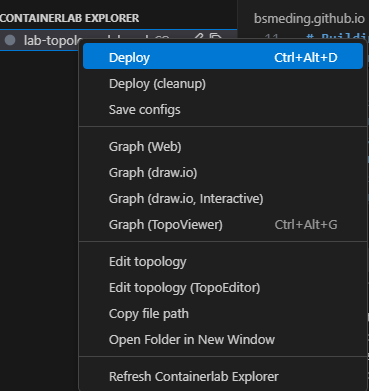
4. Visual Topology Editor
- Right-click on lab.yml → "Open with TopoEditor"
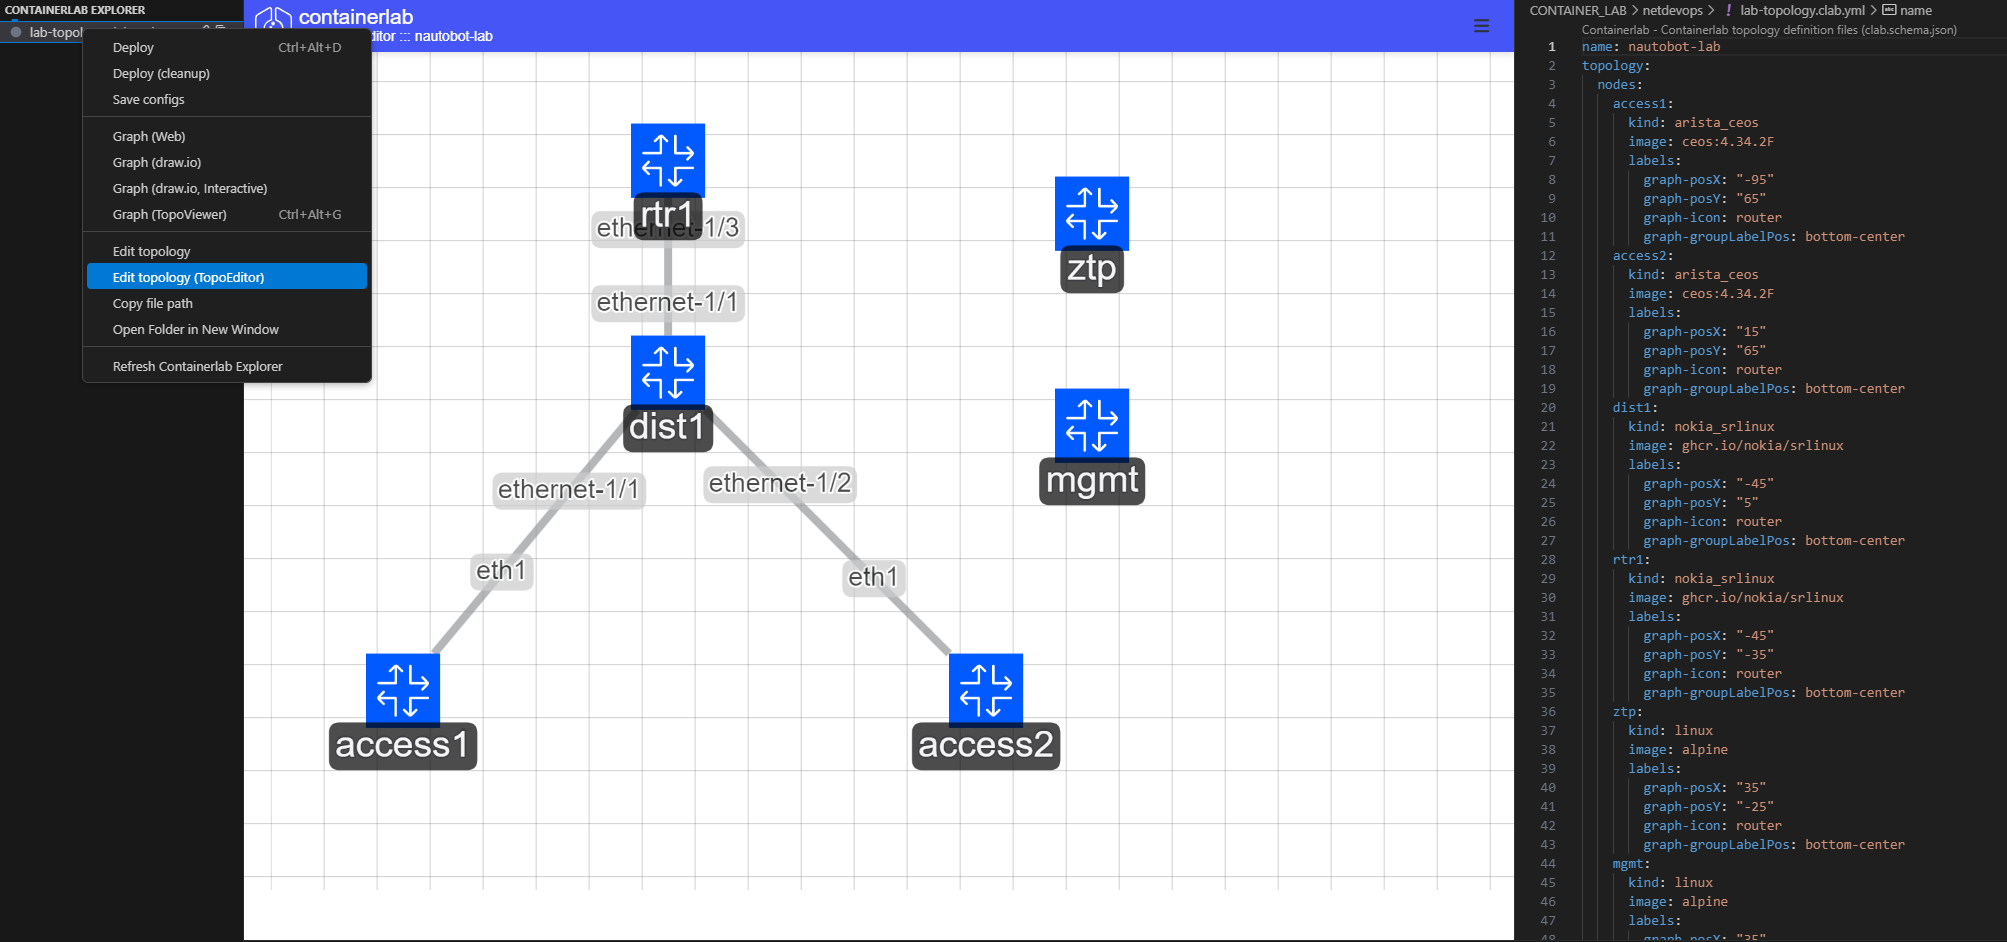
- Drag nodes from the palette to the canvas
- Connect nodes by dragging between ports
- Configure node properties in the sidebar
- Save and export your topology
5. Topology Visualization
- Right-click on lab.yml → "Open Topology View"
- Interactive diagram showing your lab topology
- Click on nodes to see details
- Export diagram in various formats
Extension Configuration
Create a .vscode/settings.json file in your project:
{
  "containerlab.imagesPath": "./images",
  "containerlab.labsPath": "./labs",
  "containerlab.configsPath": "./configs",
  "containerlab.defaultTopology": "lab.yml",
  "containerlab.autoDeploy": false,
  "containerlab.autoDestroy": true
}
Keyboard Shortcuts
| Shortcut | Action |
|---|---|
Ctrl+Shift+P → "ContainerLab: Deploy" |
Deploy current lab |
Ctrl+Shift+P → "ContainerLab: Destroy" |
Destroy current lab |
Ctrl+Shift+P → "ContainerLab: List" |
List running labs |
Ctrl+Shift+P → "ContainerLab: Connect" |
Connect to selected device |
Tips for Using the Extension
- Organize your projects with separate directories for each lab
- Use the visual editor for complex topologies
- Leverage the topology viewer for documentation
- Set up keyboard shortcuts for common operations
- Use the integrated terminal for advanced commands
Troubleshooting
Common Issues
-
Image Import Errors:
-
Network Connectivity Issues:
-
Permission Issues:
-
Extension Issues:
Debug Commands
# Enable debug mode
containerlab --debug deploy -t lab.yml

# Check containerlab version and configuration
containerlab version
containerlab --help

# Validate topology file
containerlab validate -t lab.yml

# Show detailed lab information
containerlab inspect --name my-lab --all
Next Steps
Now that you have containerlab set up, you can:
- Explore more topologies: Try different network designs and vendor combinations
- Learn advanced features: Check out the ContainerLab Extended Configurations tutorial
- Integrate with automation: Use Ansible, Python, or other tools to automate lab operations
- Build CI/CD pipelines: Automate lab testing and validation
- Create training environments: Build labs for network training and certification
For more advanced topics, check out: - ContainerLab Extended Configurations - Advanced features and automation - ContainerLab Overview and Installation - Comprehensive guide - Building a Reusable Network Automation Lab - Complete lab example - Containerlab Documentation
Happy labbing! 🚀